mysql

Copying  one table to another table with and without content

CREATE TABLE `uday` LIKE `uday_new`;
INSERT INTO `uday` SELECT * FROM `uday_new`;

Normalising data means eliminating redundant information from a table and organizing the data so that future changes to the table are easier.
Denormalozation means allowing redundancy in a table.

PRIMARY KEY and UNIQUE KEY enforces the Uniqueness of the values (i.e. avoids duplicate values) on the column[s] on which it is defined.  Also these key’s can Uniquely identify each row in database table. primary key can be referred as foreign key and unique key can not refer as foreign key

Below table lists out the major difference between PRIMARY KEY and UNIQUE KEY:

PRIMARY KEY UNIQUE KEY
NULL It doesn’t allow Null values.
Because of this we refer
PRIMARY KEY = UNIQUE KEY + Not Null CONSTRAINT
Allows Null value. But only one Null value.
INDEX By default it adds a clustered index By default it adds a UNIQUE non-clustered index
LIMIT A table can have only one PRIMARY KEY Column[s] A table can have more than one UNIQUE Key Column[s]
Primary Key: 
 -1 Primary key is used to avoid the duplication of records under same column
 -2 Primary key is used to uniquely identify the each record from table 
 -3 You can use only one primary key at a time on single table
 -4 It does not allow any null value or duplicate value
 
  
Foreign Key :
   
-1 it is used to give the reference of another table primary key..when i update the child table 
record then it does not allow me..first i need to update from parent table then it is updated in 
child table
 
Foreign keys are used to reference unique columns in another table. So, for example, a foreign key
can be defined on one table A, and it can reference some unique column(s) in another table B. 
Why would you want a foreign key? Well, whenever it makes sense to have a relationship between columns
in two different tables.
Tagged with: ,
Posted in mysql

php

Diff b/w JAVA & PHP :

1. In PHP, there is no method overloading, but methods and functions can have optional parameters.

2. PHP code largely embed with HTML document. Much like JSP.

3. Method overriding and overloading is quite natural in Java but a bit of a kludge in PHP

4. PHP object method calls use the -> operator. Java uses the . operator

5. PHP offers OOP (object oriented programming) as an option that is ignored in most projects. In, Java, OOP is the default.

6. Java is compiled to bytecode, PHP is interpreted.

7. PHP requires an explicit $this be used when an object calls its own methods. Java does not.

8. Java Class library provides a mechanism to implement threads. PHP has no such mechanism.

9. Class names in Java are case sensitive. Strings are not mutable in Java. All method parameters are passed by value in Java.

Types of Errors :

1. Parse or syntax error. –> while syntax error. It will stop execution. unclosed quotes, missing or extra parenthesis, Unclosed braces, Missing Semicolon.

2. fatal error —> It stop the script execution. If you trying to access undefined function. It will show fatal error.

3. Notice error –> It same as warning error. It will occur while trying to access undefined variable.

4. Warning error –> It will not stop execution. Warning error occur due to incorrect number of parameters to function and include file missing.

mysql_connect —> we can close the connection by using mysql_close(). It will close connection automatically.

mysql_pconnect –> we are not able to close connection. If you trying to close the connection connection will override.

Posted in php

Joins

joins

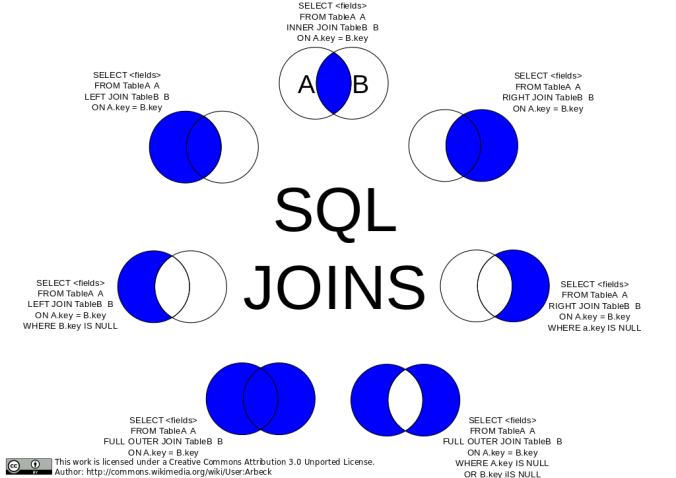
FULL OUTER JOIN

You don’t have FULL JOINS on MySQL, but you can sure emulate them.

For a code SAMPLE transcribed from this SO question you have:

with two tables t1, t2:

SELECT * FROM t1 LEFT JOIN t2 ON t1.id = t2.id
UNION
SELECT * FROM t1 RIGHT JOIN t2 ON t1.id = t2.id

or

SELECT t_13.value AS val13, t_17.value AS val17 FROM t_13 LEFT JOIN t_17
ON t_13.value = t_17.value
UNION ALL
SELECT t_13.value AS val13, t_17.value AS val17 FROM t_13


The FULL OUTER JOIN keyword returns all rows from the left table (table1) and from the right table (table2).

The FULL OUTER JOIN keyword combines the result of both LEFT and RIGHT joins.

RIGHT JOIN

The RIGHT JOIN keyword returns all rows from the right table (table2), with the matching rows in the left table (table1). The result is NULL in the left side when there is no match.

SELECT admin.username, employee_login.username FROM admin RIGHT JOIN employee_login
ON admin.username=employee_login.username;

output

username username
udhaya udhaya
NULL sabri
NULL sanjay
NULL sanju
NULL sanju
NULL arun
NULL sja
NULL sdfdsf
NULL dfdsfds
NULL dfdsfds

LEFT JOIN

The LEFT JOIN keyword returns all rows from the left table (table1), with the matching rows in the right table (table2). The result is NULL in the right side when there is no match.

SELECT admin.username, employee_login.username FROM admin LEFT JOIN employee_login
ON admin.username=employee_login.username;

username username
admin NULL
udhaya udhaya

INNER JOIN

The INNER JOIN keyword selects all rows from both tables as long as there is a match between the columns in both tables.  That do not have matches in “Orders”, these customers will NOT be listed.

SELECT admin.username, employee_login.username FROM admin JOIN employee_login
ON admin.username=employee_login.username;

 
username username
udhaya udhaya
Tagged with: ,
Posted in mysql

Java Basic

Java developed by sun engineer James Gosling in the year of 1990.

Difference B/W Java & C++

C++                                                                               Java

1.It supports pointer                                1. It does not support pointer

2.It supports template                             2. It does not support template

3.It support virtual functions               3. It does not support virtual functions

4. It support typedef, preprocessor   4. It’s not.

5. It support structure & unions            5. Its not.

6.It support enums.                                    6. Its not.

Different ways to create objects in Java

There are many different ways to create objects in java:

1. Using new keyword
This is the most common way to create an object in java. I read somewhere that almost 99% of objects are created in this way.

MyObject object = new MyObject();

2. Using Class.forName()
If we know the name of the class & if it has a public default constructor we can create an object in this way.

MyObject object = (MyObject) Class.forName("subin.rnd.MyObject").newInstance();

 3. Using clone()
The clone() can be used to create a copy of an existing object.

MyObject anotherObject = new MyObject(); 
MyObject object = anotherObject.clone();

4. Using object deserialization
Object deserialization is nothing but creating an object from its serialized form.

ObjectInputStream inStream = new ObjectInputStream(anInputStream ); 
MyObject object = (MyObject) inStream.readObject();

5. Factory Methods

Ex:- NumberFormat obj=NumberFormat.getInstance();

6. Classloader

Ex:-  this.getClass().getClassLoader().loadClass(“com.amar.myobject”).newInstance();

Oops :

Java is an Object-Oriented Language. As a language that has the Object Oriented feature, Java supports the following  concepts:

  • Polymorphism
  • Inheritance
  • Encapsulation
  • Abstraction
  • Classes
  • Objects
  • Instance
  • Method
  • Message Parsing
  • Object – Objects have states and behaviors. Example: A dog has states – color, name, breed as well as behaviors -wagging, barking, eating. An object is an instance of a class.
  • Class – A class can be defined as a template/blue print that describes the behaviors/states that object of its type support.

Variables in Java:

  • Local variables: Variables defined inside methods, constructors or blocks are called local variables. The variable will be declared and initialized within the method and the variable will be destroyed when the method has completed.
  • Instance variables: Instance variables are variables within a class but outside any method. These variables are instantiated when the class is loaded. Instance variables can be accessed from inside any method, constructor or blocks of that particular class.
  • Class variables: Class variables are variables declared with in a class, outside any method, with the static keyword.

Serialisation is the process of turning an object into a series of bytes for transferring or storing.

Deserialization those same bytes and turns them back into objects.

Transient variable in Java is a variable whose value is not serialized during Serialization and which is initialized by its default value during de-serialization.(The object or variable will not persist)

Volatile the value will be changed unexpectedly by the other part of the program.

Access specifiers gives access to outside of applications. A.S are public, private, protected, defaults

Access Modifiers gives additional meaning to data, method and class. A.M are final, static(class, methods, variables), abstract(class,methods).

Primitive Data Types:  int, long, short, byte, double, float, boolean, char. (boolean, char not support integer. other six will support integer)

Reference/Object Data Types: It declared as static variables(class variables), instance variables, method parameters or local variables. You can declare one or more reference variables  of the same type in a single line. Ex Object o, Dog myref, String s1,s2;


Tagged with: , ,
Posted in core java

Custom Module

udhaya.info

name = udhaya
description = This is my first custom module
core = 7.x
package = udhaya
files[] = udhaya.module

udhaya.module

<?php

function udhaya_block_info(){
$blocks = array();
$blocks[‘info’] = array(
‘info’ => t(‘Custom Module!’),
);
return $blocks;
}

function udhaya_block_view($delts = ”) {
$block = array();
$block[‘subject’] = t(‘HelloWorld’);
$block[‘content’] = ‘This is my first custom block’;
return $block;
}

?>

Mail Module

demo.info

name = demo
description = demo
core = 7.x
package = demo
files[] = demo.module

demo.module

<?php

function demo_block_info(){
$blocks = array();
$blocks[‘info’] = array(
‘info’ => t(‘demo Module!’),
);
return $blocks;
}

function demo_block_view($delts = ”) {
$block = array();
$block[‘subject’] = t(‘HelloWorld’);
$block[‘content’] = drupal_get_form(‘demo_custom_form’);
return $block;
}

function demo_custom_form($form, $form_state) {
$form = array();
$form[’email’] = array(
‘#type’ => ‘textfield’,
‘#title’ => ‘To Email’,
‘#size’ => 30,
‘#prefix’ => ‘<div id=”email-field-wrapper”>’,
‘#suffix’ => ‘</div>’,
‘#required’ => TRUE,
);
$form[‘from_email’] = array(
‘#type’ => ‘textfield’,
‘#title’ => ‘From Email’,
‘#size’ => 30,
‘#prefix’ => ‘<div id=”from-email-address”>’,
‘#suffix’ => ‘</div>’,
‘#required’ => TRUE,
);
$form[’email_body’] = array(
‘#type’ => ‘textarea’,
‘#title’ => ‘Email Body’,
‘#prefix’ => ‘<div id=”email-body”>’,
‘#suffix’ => ‘</div>’,
‘#required’ => TRUE,
);
$form[‘submit_form’] = array(
‘#type’ => ‘submit’,
‘#value’ => t(‘Send Email’),
‘#submit’ => array(‘demo_custom_form_submit’),
);
$form[‘#validate’] = array(‘demo_custom_form_validation’);
return $form;
}

function demo_custom_form_validation($form, &$form_state) {
$mail = $form_state[‘values’][’email’];
$from_email = $form_state[‘values’][‘from_email’];
if (!valid_email_address($mail)) {
form_set_error(’email’, t(‘Please Enter a valid to email address.’));
}

if (!valid_email_address($from_email)) {
form_set_error(‘from_email’, t(‘Please Enter a valid from email address.’));
}
}

function demo_custom_form_submit($form, &$form_state) {
drupal_set_message(“form is submitted, thanks”);
$email_content = get_mail_content($form_state);
$params = array(‘body’ => $email_content);
$key = ‘demo_email’;
$to = $form_state[‘values’][’email’];
$from = $form_state[‘values’][‘from_email’];
$mail = drupal_mail(‘demo’, $key, $to, language_default(), $params, $from);
}

function demo_mail($key, &$message, $params) {
$language = $message[‘language’];
switch ($key) {
case ‘demo_email’:
$message[‘subject’] = t(‘demo Email’);
$message[‘body’][] = $params[‘body’];
break;
}
}

function get_mail_content($form_state) {
$email_to = $form_state[‘values’][’email’];
$pos = strpos($email_to, ‘@’);
$user_name = substr($email_to, 0, $pos);
$body = ”;
$body .= ‘Hi ‘ . $user_name . ‘<br>’;
$body .= ‘Please find my demo email. <br>’;
$body .= $form_state[‘values’][’email_body’] . ‘<br>’;
$body .= ‘Thanks<br>’;
$body .= ‘Demo Team’;
return $body;
}
?>

uday.info

name = uday
description = uday
core = 7.x
package = uday
files[] = uday.module

uday.module

<?php
function uday_block_info(){
$blocks = array();
$blocks[‘info’] = array(
‘info’ => t(‘database Module!’),
);
return $blocks;
}

function uday_block_view($delts = ”) {
$block = array();
$block[‘subject’] = t(‘HelloWorld’);
$block[‘content’] = drupal_get_form(‘uday_nameform’);
return $block;
}

function uday_nameform() {
$form[‘first_name’] = array(
‘#title’ => t(‘First Name’),
‘#type’ => ‘textfield’,
‘#description’ => t(”),
);
$form[‘last_name’] = array(
‘#title’ => t(‘Last Name’),
‘#type’ => ‘textfield’,
‘#description’ => t(”),
);
$form[‘city’] = array(
‘#title’ => t(‘City’),
‘#type’ => ‘textfield’,
‘#description’ => t(”),
);
$form[‘submit’] = array(
‘#type’ => ‘submit’,
‘#value’ => t(‘submit’)
);
$form[‘#submit’][] =’uday_nameform_submit’;
return $form;
}

function uday_nameform_validate($form, $form_state) {
if($form_state[‘values’][‘first_name’] == “”) {
form_set_error(‘first_name’, ‘Name can not be empty!’);
}
}

function uday_nameform_submit($form, $form_state) {
$f_name = $form_state[‘values’][‘first_name’];
$l_name = $form_state[‘values’][‘last_name’];
$city = $form_state[‘values’][‘city’];
$sql= db_query (“INSERT into {uday_info} (sno, datetime, first_name, last_name, city)
VALUES (NULL, NOW(),’$f_name’, ‘$l_name’, ‘$city’)”);
$sql -> execute();
}

?>

Tagged with: , ,
Posted in drupal

Interview Questions

Question 1.

Which of the following are valid Java Keywords

A. goto

B. final

C. NULL

D.finally

E. extend

F. main

Ans : goto, final, finally

Question 2.

True / False. Select if True
A. Instance variables are always initiated to defaults //True

B. Local variables are always initiated to defaults //False

C. Array Elements are always initiated to defaults //True

D. Object references that are not initialized
explicitly will have their value set to null always //False

Question 3.

Select all the following statements about ‘wait’ method that are true

A. wait() is static final method that cannot be overrided.

B. wait() is an instance method of object class.

C. wait() is an instance method of Thread class.

D.Thread must have lock an the object involved to call
wait().

Ans : B & D

Question 4.

Select the code segments(assuming is part of valid class) below that compile and run correctly with output: We are Equal

A. int i = 10;

long l = 10L;
if( i == l )
System.out.println(“We are Equal”); //Equal

B. int i = 10;
Integer ii = new Integer(10);
if( i == ii)
System.out.println(“We are Equal”); //Equal

C. int i = 10; char c = 10;
if( c == i)
System.out.println(“We are Equal”); //Equal

D. Integer ii = new Integer(10);
Integer jj = new Integer(10);
if(ii == jj)
System.out.println(“We are Equal”); //Not Equal

E. String s1 = “Null”;
String s2 = “Null”;
if( s1 == s2)
System.out.println(“We are Equal”); //Equal

F. String s1 = “Null”;
String s2 = new String(s1);
if( s1 == s2)
System.out.println(“We are Equal”); //Not Equal

Question 5.

Which of the following are true about overloading & overridding.

A. Overrided methods return different return types and

will be in different classes. //False

B. Overloaded methods supplement where as overridden
method replace the method it overrides. //True

C. Return type of overriden method must be identical to
return type of method it overrides. //True

D. Given a method
public void aMethod(int i,float f);
the method
public void aMethod(float f,int i);
is a possible overridden method. //False

Question 6.

Which of the follwing is true about static modifier.

A. static can be applied to : instance variables, methods,

code Segments and classes. //True

B. a static method cannot be overridden. //True

C. inner classes can be both static & private. //True

D. a static reference cannot be made through non static
method or code block. //True

E. abstract & static both can be applied together to a
method. //False

Question 7.

When can we use same method name in java for two different methods

A. If the two methods are in two unrelated clasess. //False


B. If the two methods are in the same class and they
differ in argument & return type. //True

C. If one method is in base class, other is in its sub
class and the two mehtods differ only in return type. //False

D. If one method is in base class, other is in its sub class
and the two mehtods differ both arguments list and in
return type. //True

Question 8.

Given the code, what is the output

public class demo{
static int i = 10;
public static void main(String[] arg){
static int i = 20;
System.out.println(“i is :”+i);
}
}

A. Code Does’t Compile. //True

B. Code Compiles but error will be generated at runtime.

C. Code Compiles & runs, output is
i is : 10

D. Code compiles & runs, output is
i is : 20

Question 9.

public class demo
{
public static void main(String[] args)
{
int i = 10;
int j = 10;
boolean b = false;

if( b = i == j)
System.out.println(“True”);
else
System.out.println(“False”);
}
}

Ans : True


Question 10.

class demo
{
public static void main(String []args)
{
Byte b1 = new Byte(“127”);
if(b1.toString() == b1.toString())
System.out.println(“True”);
else
System.out.println(“False”);
}
}

Ans : False


Posted in core java

Interview questions

Even character replacing with alphabet number and Vowels replace with alphabet numbers

import java.util.Scanner;
public class demo {
public static void main(String[] args) {

Scanner sc = new Scanner(System.in);
System.out.print(“Enter your string: “);
String even_odd = sc.next();

System.out.println(“Even character replacing with alphabet number”);
for(int i = 0; i<even_odd.length(); i++){
if(i%2==0){
System.out.print(even_odd.charAt(i));
} else if(i%2==1){
//System.out.print(even_odd.charAt(i));
String str = Character.toString(even_odd.charAt(i));
String input=str.toLowerCase();
String alphabet=”abcdefghijklmnopqrstuvwxyz”;
for(int j=0; j<input.length();j++){
System.out.print(alphabet.indexOf(input.charAt(j))+1);
}

}
}
System.out.println();
System.out.println(“Vowels replace with alphabet numbers”);
for(int i=0;i <even_odd.length();i++){
if((even_odd.charAt(i) == ‘a’) || (even_odd.charAt(i) == ‘e’) ||
(even_odd.charAt(i) == ‘i’) || (even_odd.charAt(i) == ‘o’) ||
(even_odd.charAt(i) == ‘u’)) {
String str = Character.toString(even_odd.charAt(i));
String input=str.toLowerCase();
String alphabet=”abcdefghijklmnopqrstuvwxyz”;
for(int j=0; j<input.length();j++){
System.out.print(alphabet.indexOf(input.charAt(j))+1);
}
//System.out.print(even_odd.charAt(i));
} else { System.out.print(even_odd.charAt(i)); }
}

}
}

Reverse string without reverse function

1.public class demo
{
public static void main(String args[])
{
String s=”arun kumar”;
StringBuilder sb=new StringBuilder();
for(int i=s.length()-1; i>=0; i++)
sb.append(s.charAt(i));

}
}

2.

public class reverse
{
public static void main(String args[])
{
one r=new one();
}
}
class one
{
public String reverse(String sentence)
{
String reverse = “i am udhaya”;
char [] s = sentence.toCharArray();
int first = s.length-1;
int last = s.length-1;
String temp = “”;

for(int i = s.length-1; i>=0; i–)
{
temp = ” “;
while(s[first] != ‘ ‘)
{
System.out.println(s[first]);
first–;

}
while(last != first)
{
temp = s[last] + temp;
last–;
i–;
}
reverse = reverse + temp;
}
return reverse;
}
}

3.

import java.util.ArrayList;

public class Reverser
{
public static void main(String args[])
{
String myName = “Here we go”;
ArrayList al = new ArrayList();
al = recursiveMethod(myName,al);
al.trimToSize();
StringBuilder sb = new StringBuilder();

for(int i = al.size()-1; i>=0;i–)
{
sb.append(al.get(i)+” “);

}
System.out.println(sb);

}
public static ArrayList recursiveMethod(String myName,ArrayList al)
{

int index = myName.indexOf(” “);
al.add(myName.substring(0, index));
myName = myName.substring(index+1);
if(myName.indexOf(” “)==-1)
{
al.add(myName.substring(0));
return al;
}
return recursiveMethod(myName,al);

}
}

Input in int output in string
import java.io.BufferedReader;
import java.io.IOException;
import java.io.InputStreamReader;

public class one {
public static void main(String[] args) throws IOException {
BufferedReader br=new BufferedReader(new InputStreamReader(System.in));
int i=Integer.parseInt(br.readLine());
if(i==1)
{
System.out.println(“one”);
}
else if(i==2)
{
System.out.println(“two”);
}
else if(i==3)
{
System.out.println(“three”);
}
else if(i==4)
{
System.out.println(“four”);
}
else if(i==5)
{
System.out.println(“five”);
}
else if(i==6)
{
System.out.println(“six”);
}
else if(i==7)
{
System.out.println(“seven”);
}
else if(i==8)
{
System.out.println(“eight”);
}
else if(i==9)
{
System.out.println(“nine”);
}
else if(i==10)
{
System.out.println(“ten”);
}
else if(i>10)
{
System.out.println(“Enter valid option”);
}
else
{
System.out.println(“process over”);
}
}

}

Posted in core java

Control Who Can View Drupal Nodes: Content Access

Although Drupal comes with 5 permissions for content, none of them deal with access. Here are the 5 default permissions:
media_1355779199660.png

In this list, you can see create, edit and delete but you can’t see view.

There are a lot of solutions to this problem. In this tutorial, we’re going to introduce you to one of them: the Content Access module. This week we’ve always recommended Taxonomy Access.

What’s the difference between these two modules?

  • Content Access works best if your user roles closely match your content types.
  • Taxonomy Access Control works best if you have a more complicated permissions system and one that doesn’t closely match your content types.

Access Control for Content Types

  • Install Content Access from https://drupal.org/project/content_access
  • Enable the module.
  • Go Structure > Content Types
  • Click Manage fields next to the content type you want to edit.
  • You’ll notice a new tab called Access Control at the top of the page. Click that tab.
media_1355780003650.png
  • You’ll now be able to contol which user roles can view this content:
media_1355780152910.png

Access Control for Single Nodes

Content Access can also be more flexible if needed. You can apply permissions to individual nodes.

  • Make sure you are on the Manage fields > Access Control page that we saw above.
  • Click the “Enable per content node access control settings” box.
  • Visit a content item that’s in this content type.
  • You’ll see an Access Control tab where you can control the permissions for just this node.
media_1355780250508.png


Access Control Customized for Your Needs

You can make Content Access act in much more sophisticated ways by using the Rules module. Content Access is fully integrated with Rules, so you can automatically set permissions for different types of content.

  • Install Rules.
  • Enable both the Rules and Rules UI modules.
  • Enable the Content Access Rules Integrations module.

In the example we’re going to show you, we have a user role called “Writers” . These people will add content to our site, but we don’t want their content to be visible by everyone. We only want it to be visible to people in another user role called “Editors”. Here’s how we can set this up:

  • Go to Configuration, then Rules.
  • Click “Add new rule”.
media_1355782679121.png
  • Click Add condition.
  • Choose If Users has roles.
  • For Data selector, choose node:author.
  • For Roles, choose Writers.
  • Click Save
media_1355782789281.png
  • Click Add action.
  • Choose Grant Access by role.
  • Give the Editors the ability to view the content.
media_1355783035437.png
Posted in drupal

Creating a Drupal Slideshow with Views Slideshow

Step 1: Installation

You’re also going to need a single file that contains a JQuery slideshow script. This will need to be uploaded manually.

media_1351543536543.png
  • Download the file which will be called jquery.cycle.all.js
  • Access your site files.
  • Browse to the /sites/all/ folder.
  • Create a folder called /ibraries/ so that the path is /sites/all/libraries/
  • Create a folder called /jquery.cycle/ so that the path is /sites/all/libraries//jquery.cycle/
  • Upload the jquery.cycle.all.js file into that last folder.
media_1351543973645.png

Step 2: Views

We’re going to create our slideshow using Views.

  • Go to Structure > Views > Add new view.
  • Check Create a block
  • Choose Slideshow for the Display format
  • Choose 1 for the Items per page
media_1351542979941.png
  • Click Add.
  • Select Image.
  • Click Apply (All displays).
  • Set the Image style to Large. We’ll change this again later.
media_1351543165602.png
  • Click Apply (All displays).
  • Click Add.
  • Select Image.
  • Check the box which says Exclude from display.
  • Set the Image style to Thumbnail. We’ll also change this later.
  • Click Apply (All displays).
  • Click Content:Title
  • Click Remove

Once you’re finished, your fields area should look like the area below.

media_1351548620566.png
  • Find the Format area on the left-hand side of the Views page.
  • Click Settings next to Slideshow.
media_1351548657236.png
  • Scroll down to the cycle options.
  • Check the box Pager under Bottom Widgets.
  • Select the second of the two Image fields as the Pager fields..
media_1351549029523.png
  • Click Apply (All displays).
  • Click Apply (All displays). It should be close to looking like an active slideshow, but it will still have design problems. Your images won’t be the perfect size yet and your smaller images will be stached vertically.
media_1351549155895.png
  • In the center of your Views screen, set the Pager so that it contains the number of small iterms you want underneath your main image.
  • Click Save to record all your changes so far.
media_1351551001665.png

Step 3: Design

First, let’s set up the correct style for our images:

  • Go to Configuration > Image Styles.
  • Click Add style.
  • Enter slideshow_main
  • Click Create new style
  • Next to Select a new effect, choose Resize and click Add
  • Enter the height and width you’d like for your main slideshow image. Don’t worry about getting it exactly right first time. You can always come back and change this size.
  • Click Save

Now let’s create the style for our smaller thumbnails.

  • Repeat the process above.
  • This time create a style called slideshow_pager

Now, we’ll apply those styles to our View.

  • Go to Structure > Views.
  • Click edit next to your slideshow view.
  • Click on the first Image field and set Image style to slideshow_main
  • Click on the second Image field and set Image style to slideshow_pager

Now click Save and let’s go see your slideshow.

  • Go to Structure > Blocks.
  • Publish your view.

The final remaining problem is going to be the vertical images. We can fix that with CSS.

  • Go to your theme’s CSS file.
  • Add some code like this:


1..views-slideshow-controls-bottom .views-slideshow-pager-field-item { float: left; margin: 5px 19px 0 0; }


As a final step, you will need to tweak your image styles and your CSS to match your design.

Here’s my end result, after this tutorial, and using dummy images:

media_1351549934591.png
Posted in drupal

Using Drupal’s Advanced Forum Module

Drupal’s core forum module has been around for a long, long time. It was first introduced back into Drupal 3 in 2001!

The forum module is fairly basic but it has proven reliable enough to handle some large sites such ashttp://drupal.org/forum. However, the module does lack many of the more advanced features that you’d expect to see in today’s forums such as VBulletin and phpBB.

If you want a more powerful forum in your Drupal site, we recommend Advanced Forum. The Advanced Forum module has many of the same features as VBulletin and phpBB, but it’s also tightly integrated into Drupal.

In this tutorial, we’ll show you through how to install, configure and use Advanced Forum.

media_1356908503541.png

Installing Advanced Forum

Install and enable the three modules required for Advance Forum to work.

  1. Advanced Forum: https://drupal.org/project/advanced_forum
  2. Views: https://drupal.org/project/views
  3. Chaos Tools: https://drupal.org/project/ctools

Configure Advanced Forum

The Advanced Forum module comes already configured but you can make changes.

  • Click on Configuration in the black admin menu bar.
  • Click on Advanced Forum in the Content Authoring box on the left side of the screen.
media_1356901799041.png

You’ll now see the general settings area.

These settings focus primarily on how the forums, forum topics, and comments are styled on the site. The Advanced Forum module comes prepackage with several theming options for your forum. Review the list of Advanced forum styles and choose one that you like or, if you are familiar with theming in Drupal, you can copy the tpl.php files and/or CSS from the module and paste it into your theme. Then, you can edit the files and CSS to meet your needs.

As you can see, one of the features the Advanced Forum module offers is the ability to use a content type other than default forum topic that comes with the Forum module. You can create your own forum topic content type. The other configuration settings under General settings address how your forum topics are styled. Review the brief explanation for each option to learn more about that option.

media_1356901865179.png

 Your next configuration opitons for breadcrumbs and the display of the comment quantity.

media_1356902137751.png

The last Advanced Forum configuration option allows you to include an image for your forum. By default, this feature will not work because the forum vocabulary does not have an image field by default. If you want an image for your forums, add the image field to the Forum vocabulary.

media_1356902250507.png

Other Settings

In addition to the settings discussed above, below are few others to consider.

Forums: The Forum module has some its own settings to consider. For instance, as you can see in the image above, the configuration options for Forum include adding containers and forums. By default, the Forum module comes with a General Discussion forum.

  1. Click on Structure > Forums
  2. Click on Add container to create another container. Look at the screen shot at the start of this tutorial. See the box labelled Forums. A container will create another box like that.
  3. Click on Add forum to create another forum. Forums are pages that group Forum topic posts.

Roles: If you want to restrict forum posts and discussions to a role other than Authenticated (or even anonymous if you are feeling adventuresome), add a forum role.

Permissions: There are at least three permissions to review and configure before opening our forum to the public.

  1. Comments
  2. User profile access
  3. Node – create/edit/delete content a forum topic to be exact.

media_1356908237231.png

Adding an Author Pane Block

Another nice feature you can add to your site is the Author pane provided by the Author Pane module. The module creates a block that you can enable to show on the Forum topic posts (as shown here).

  1. Download the Author pane module from http://drupal.org/project/author_pane
  2. Upload the module to your webserver and unpack it
  3. Enable the module
  4. Go to Structure > Blocks and click Configure next to the Author Pane block
  5. Check Forum topic under Node types to display on (assuming Forum topic is the content type you selected when configuring Advanced Forum module)
  6. Select a region under Region visibility settings (in other words, what section of the webpage do you want the block to appear)
  7. Save

Go see what it looks like by navigating to one of your Forum topic posts:

media_1356907320383.png
Posted in drupal